We’ve seen an explosion in protesting in the past few days — for good reason. The folks in power are abusing it in terrible ways. When punishment ever occurs, it’s only ever a light slap on the wrist. Human rights are trampled and people are rightfully upset. A common thread in modern protesting is livestreaming to social media. As a person who’s a couple of decades older than most of the current protesters and with a higher COVID risk due to health concerns, I don’t go out to protest as much as I used to, but do admit to living vicariously through those streams.
BUT. There are reasons why you wouldn’t want to or shouldn’t livestream your protesting.
- Livestreaming directly to a public place (YouTube, Facebook, Periscope, Twitch) can put other protesters in harm’s way. There are “Proud” and vengeful folks out there that get off on identifying protesters, doxxing them, and harassing them — both online and in person. Livestreaming in realtime doesn’t give you the opportunity to conceal faces.
- Companies and government bodies are getting better at issuing takedowns to YouTube and Facebook. There are already streamlined paths for the RIAA and MPAA to take down content with zero oversight and near-zero chance for arbitration. Streaming to your own private storage location (perhaps simultaneously while streaming to YouTube or Facebook?) makes 3rd party deletion of your content much more difficult.
- Geolocation by cellphone can potentially leave you vulnerable. Whether or not you like or accept it, this is done either legally or in a gray area — see reports of location data sold to bounty hunters and secret server rooms like AT&T’s Room 641A. It’s often a good practice to leave your phone powered down or at home. Especially phones with TouchID or FaceID, which make it easier for authority figures to illegally compel you to unlock. Some police departments even have StingRay devices that can ID individuals and intercept communications.
- The more phones actively eating up bandwidth in the area, the more congested that pocket of the cellphone network gets. If possible, it’s best to coordinate with others so that only a few people are actively streaming.
On the other hand, there are valid reasons why you might want to livestream to a private location.
- If your video immediately goes out to the cloud, you have access to it, even if your phone gets smashed or impounded.
- If your video gets archived somewhere private, then the large social media sites can’t shut it down and prevent you from accessing the archive.
- You can later can download the live segments, post-produce them (blurring the faces of fellow protesters, adding descriptive text or captions), and post them to social media.
- Or, ideally, you’d have a friend at a safe location that’s grabbing video as you upload it, performing redaction of faces in near-realtime, then uploading the clips to social media. A Spider-man Homecoming “guy in the chair,” as it were, but much less glamorous.
- You understand and own the technology stack. You can adapt it as needs require.
This blog post is a guide. It is meant to help you set up your own livestreaming server that outputs to a private location.
Full disclosure: I am an engineer with AWS Media Services. I don’t directly work on the services described here (I write firmware for appliances), but I know engineers and managers on these teams. I’ve written this guide on my own; the opinions and viewpoints are all mine. I’ve also used my own personal account for prototyping, including paying for the services. (More on the cost breakdown in the “Teardown” section below.)
Scope: This post documents a turnkey way to stream video to private storage. AWS services cost money (it’s not much — about $3 for 8 hours — but it’s nonzero). To reach the largest possible audience, this guide is aimed at folks who are “poke at the AWS Console” technical, not “compile your own web server plugins” technical or “administer your own Linux box” technical. Like everything with computers, there are other ways to achieve the same result. You can prop up an nginx webserver on your own private server, be that a server in your apartment, EC2, Linode, DigitalOcean, Dreamhost, or somewhere else. If that’s something you feel comfortable doing, then you may want to take a peek at my guide to setting up nginx for video. With that guide, you’d want to swap out the Raspberry Pi as the contribution video feed for your phone (as described later in this guide) and you’d want to increase segment length and the window of segments to keep on disk because your purpose is more of an archive than a stream.
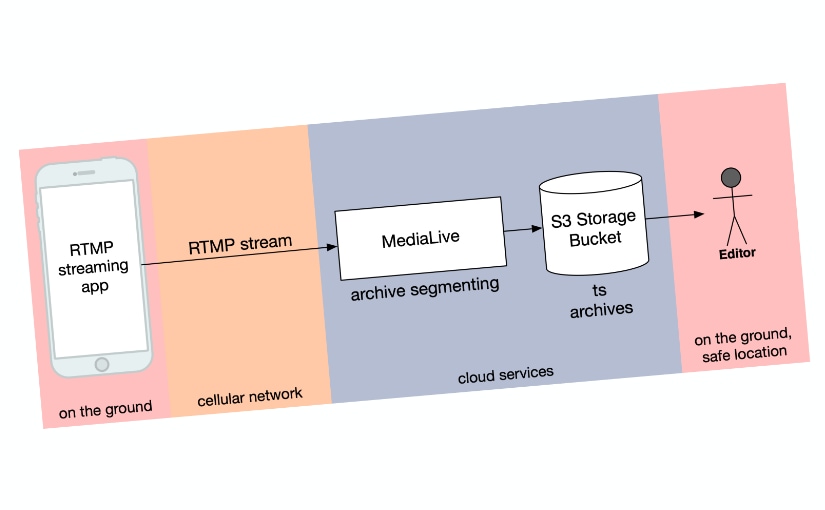
Architecture Overview
The general workflow looks like the following:

You use an app on your phone to stream from the ground. The app generates an RTMP stream that gets sent over the cellular network (or, if you’re lucky, a nearby wifi access point). That stream is received by MediaLive, which performs some minimal compression. While doing so, it segments the video into chunks — let’s say 30 seconds each — and deposits the results in an S3 bucket. An editor can then download those chunks and perform any required post-processing. Ideally, that editor is a friend in a safe place that can do editing in near-realtime and post to social media. The editing itself is beyond the scope of this blog post, but I’d recommend you check out DaVinci Resolve and check out this how-to video for blurring faces.
Prerequisites
This guide assumes you’ve signed up for AWS and can access the console. It currently assumes an iPhone for streaming, but an Android phone with a similar app that can emit RMTP is fine, too. I just don’t have any specific recommendations on that front.
The following sections of the guide will step you through setting up the S3 bucket, setting up MediaLive, setting up your phone, and then lightly touches on downloading and post-production. It concludes with costs and instructions for teardown.
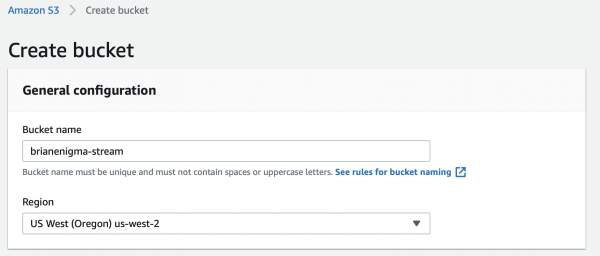
The S3 Bucket
First, log in to S3. Click on the Create Bucket button. Give it a globally unique name and put it in a region that’s close to you. In my case, I’ve picked brianenigma-stream and us-west-2 (Oregon).

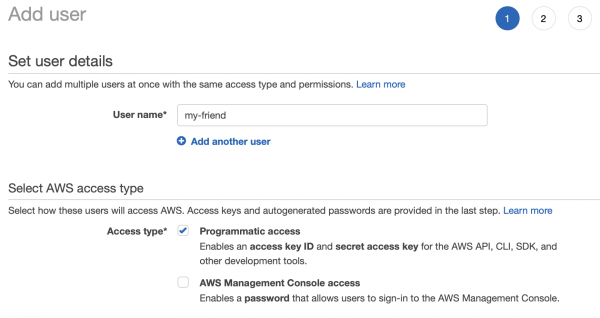
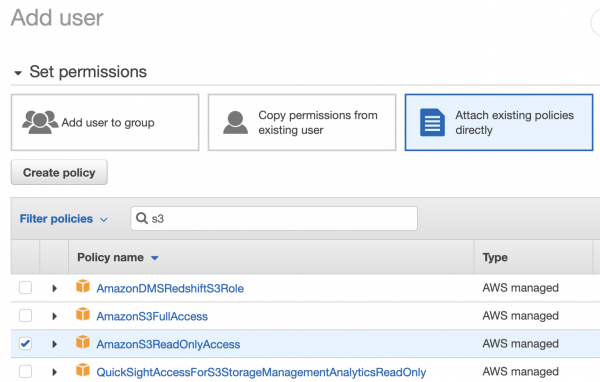
Next, go to the Identity and Access Management (IAM) console and select “Users” from the navigation tree. Click on the Add User button. Give your user a name and enable Programmatic Access. On the next screen, give that user S3 Read-Only access. Skip to the end and confirm that you want to create the user.
Show the Secret Access Key and copy down both that and the Access Key ID. Your person downloading will need these to access the bucket.

The MediaLive Instance
An instance of MediaLive is called a channel. The channel connects an input (in our case, an RTMP endpoint that your phone talks to) with an output (in our case, an S3 bucket that video file segments are written to). We’ll set all of these up now.
Go to the MediaLive console and be sure you are in the same region where you created your S3 bucket. Create a channel by giving it a name. go with the default for IAM (create role from template).
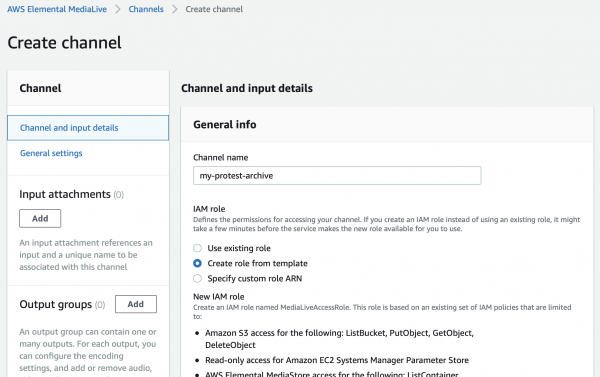
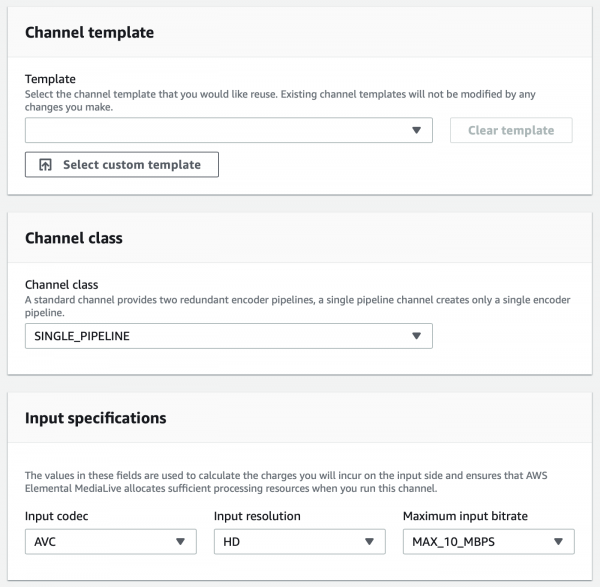
After creating the role, scroll down. Don’t select a Channel Template. They are for more conventional multi-bitrate outputs, not for archiving. For Channel Class, select SINGLE_PIPELINE, since your source is a single stream (not redundant). In the Input Specifications, leave it to AVC (that’s H.264 to normal humans) and HD, but bump down the maximum input bitrate to MAX_10_MBPS since we’ll be sending over cellular. These are both cost-saving measures.
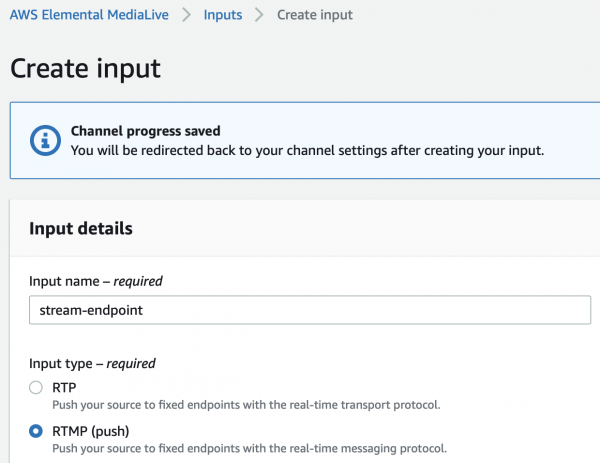
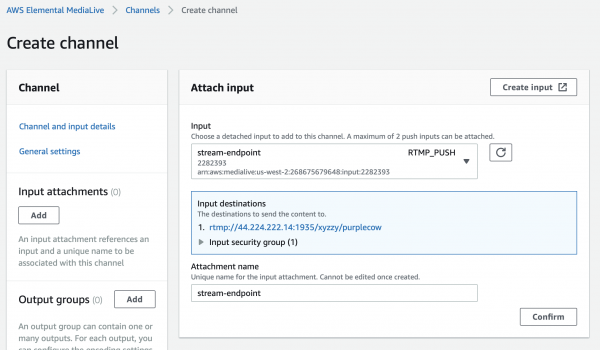
Click on the Add button under Input Attachments and then Create Input. Give it a name and define it as RTMP-Push since your phone will be pushing the stream up to the cloud.
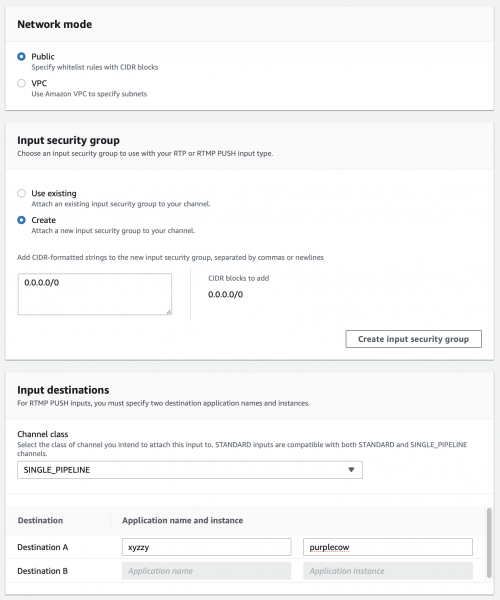
Scrolling down, select Public and create a security group with the CIDR block of 0.0.0.0/0. Under normal circumstances, you’d want to put the IP address or address range that you’ll be streaming from there. In this case, we don’t know it ahead of time, so we’ll allow streaming from the whole world. This relies on Security-Through-Obscurity (an attacker would need to know the IP address and stream names to stream), but it’s a risk we have to take for this sort of mobile streaming. Select SINGLE_PIPELINE again as the channel class, and give the application name and instance name something unique and difficult to guess. Finally, use the orange button to create the input.
Select that input for attaching, then confirm. Take note of the rtmp:// URL. That IP address and path are what you need to enter into your phone’s streaming app.
Next, click on the button to add an archive group. Use “Archive” as the type.
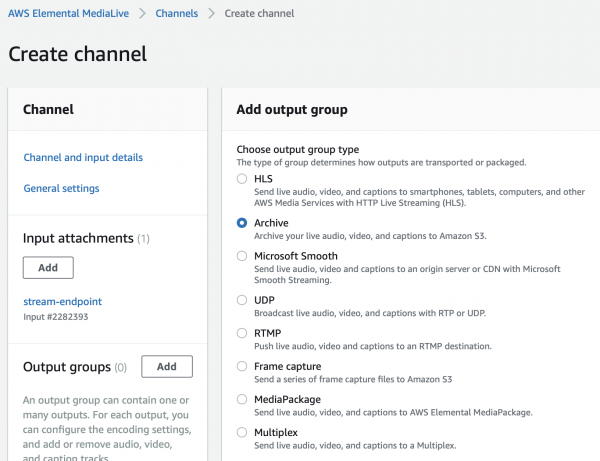
Give it the URL to the S3 bucket you created, and (under the folded “Additional Settings” triangle) bump down the rollover interval from 300 (5 minutes) to something smaller. I’d suggest something like 30 seconds. You want to strike a balance between short enough that archived segments arrive in a timely fashion, but long enough to not make editing a pain in the butt.

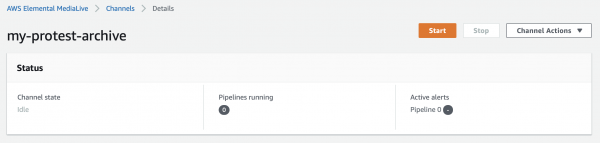
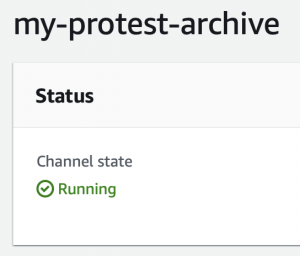
Click the big orange “Start” button and your channel will begin to spin up. It can take anywhere from a dozen seconds to five minutes for it to reach the “Running” state. Keep that in mind, and give yourself enough time to start the channel before any action starts. Once the channel reports as “Running” then you’re good to stream.
Do you remember the IP address and path of the RTMP input you created above? You’ll need that to configure your phone. If you forgot, click on the “Inputs” item in the navigation.

The Streaming Phone
The phone on the ground needs a way to capture video from the camera, encode it, and send it to the RTMP endpoint you’ve created. My preferred app for this is Larix Broadcaster, a free iPhone app. Larix is nice because it can stream to multiple locations at once — say, your private stream and YouTube.
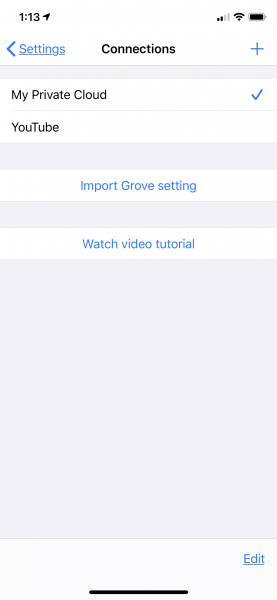
If you’re using Larix, click on the gear, go to Connections, and hit the “+” button to add a new one.
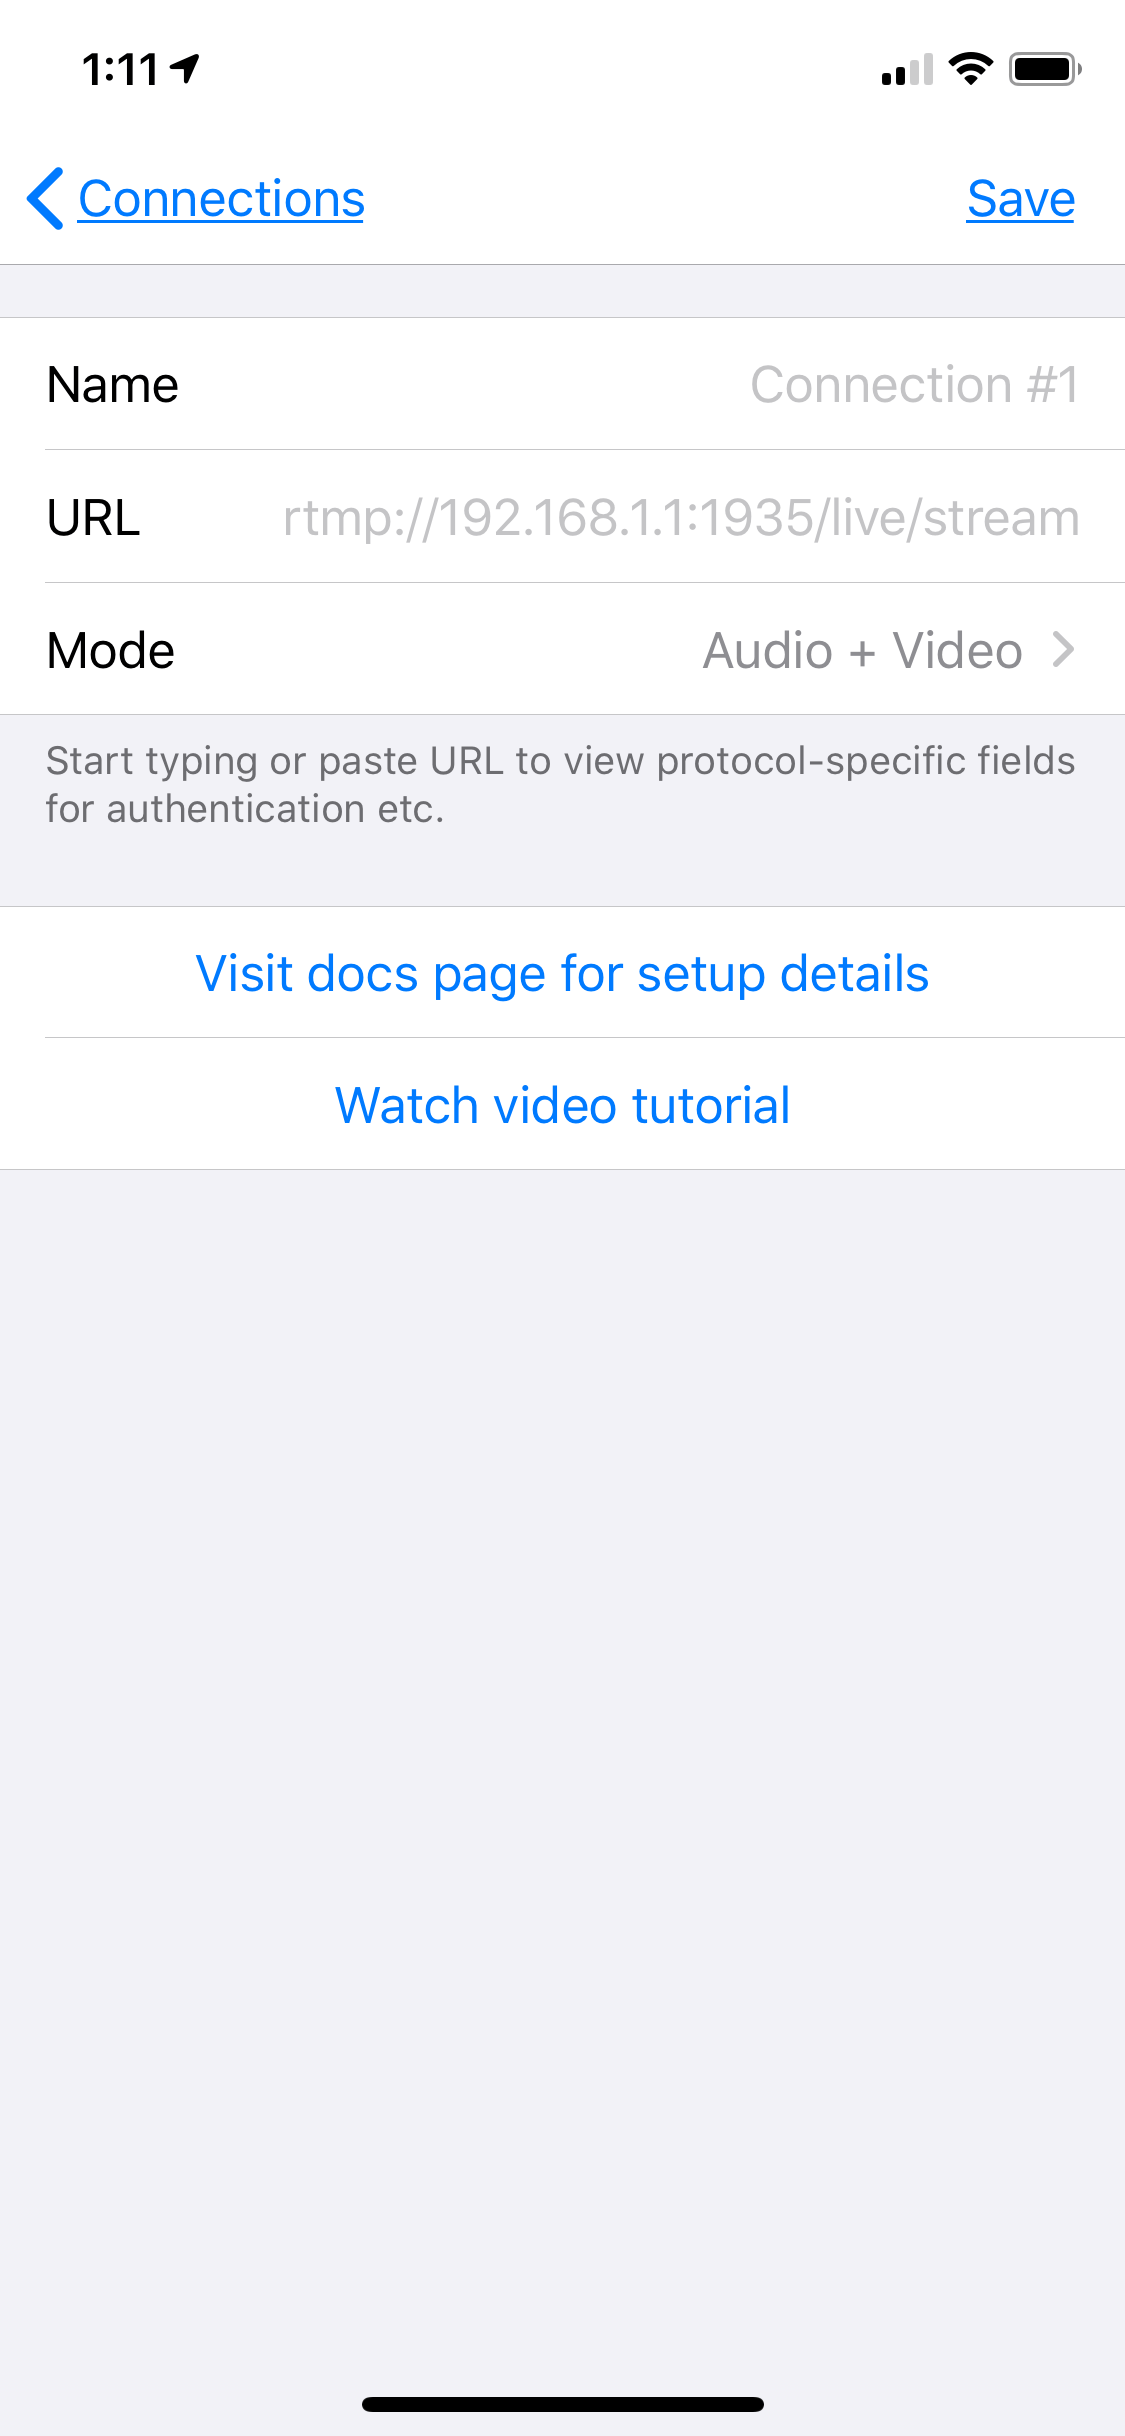

After creating it, be sure it has a checkmark next to it. Click it to toggle the checkmark if you don’t see one.
If you’d like to, you can set up connections to YouTube Live, Facebook, Vimeo, or whatever else here. The specifics of that setup are beyond the scope of this guide.
Also under the Settings, click on “Capture and Encoding” to go to the Settings app page for Larix. Under Video, ensure that the format roughly matches what we told MediaLive to expect. Namely, it’s 1920×1080 resolution, 30fps, and the H.264 format. These should be the defaults. You may also want to go into the “Record” section and enable simultaneous local recording.


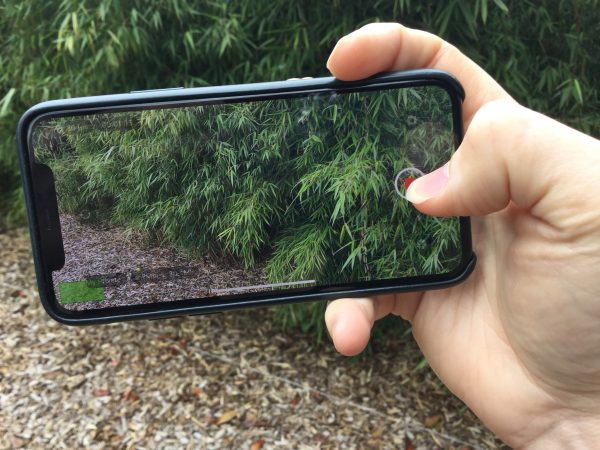
Exiting from the Settings menu, all you have to do is hit the red “Record” button to start your stream. You’ll see faint streaming statistics overlaid on the video.
Post-Production
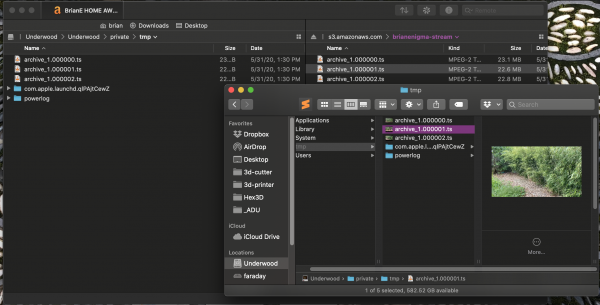
The specifics of post-production are up to you. You later, or your friend in near-realtime, will need to use an app to connect to the S3 bucket and download segments as they get uploaded. I’m a fan of Transmit by Panic Software, but you can use anything you like, including the aws command-line client. If you want to be fancy with the command line, you can run aws s3 sync on repeat.
Download the segments as they appear. They are Transport Stream (ts) files, which not all editing software will work with, but VLC will play and DaVinci Resolve will edit.
Tearing Down the Service
When you are finished streaming, it is important you tear down both the service and the input endpoint. At the time of writing, the cost of the encode, using the above settings, is about $0.36 / hour in the us-west-2 region while the encoder is running. When it is not actively encoding video, it’s still $0.01 / hour to reserve the IP address for your RTMP endpoint. It’s important that you shut all of that down to avoid unexpected fees.
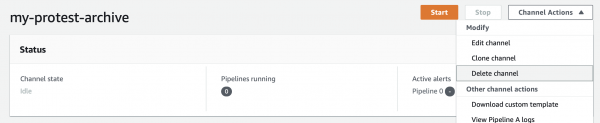
Go into the channel, hit the “Stop” button, wait for it to spin down, then use the pulldown to delete it.
Next, go over to your Inputs and delete the endpoint.

This is also the point where, if you’d like to, you can delete the S3 bucket and the IAM user you created.
Next Steps
The next steps are up to you. I’d like to hear how this has worked for you. If you have improvements to the process or alternate workflows, please share those, too. Until then, stay as safe as you can, fight the good fight, and remember that Black Lives Matter now more than ever before.
One thought on “(Intelligent) Live Video Streaming for Protesting”