I am a little surprised that I did not write about this months ago because I finished the project back in March. After building the InfoNinja, I thought about projects that would help me to hone my laser-cutting skills. Although my bolted mortise and tenson joints were adequate, and tention held everything together nicely, those joints had more slop to them than I really wanted. I also thought it would be good to build up a library of reusable cut patterns that match the materials I have on hand (from TAP Plastics) and the hardware I use (M3 screws and nuts from McMaster-Carr). This lets me copy and paste chunks of the design into new projects.
This was also about the same time that the company for which I work was expanding and moving into another building. Although we use an open office layout, a few of us had kicked around the idea of putting up nameplates so that all the new people could better identify where someone sits. I thought I would not only laser-cut a nameplate for myself, I’d make it a box and add an electronics package inside to make it glow.

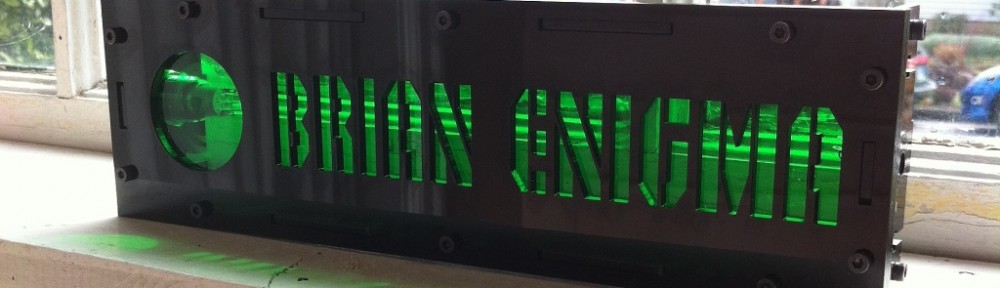
The idea was fairly simple. In the design, the top, bottom, sides and back are totally opaque and totally solid (save for some holes to place the power plug and switch). The front is two layers: one of translucent green that tints the light and provides a place to etch a “floating” logo and one opaque (like the rest) that had the cut out letters. The letters have to be cut out “stencil style” otherwise the floating center parts of the “A”, “B”, and “R” either would not be present or would need some crazy-glue work to attach.
All of the pieces fit together with slots and tabs. The tabs in the front are double-long because they go through two layers of plastic. Everything is then held securely in place with the standard screw-and-nut tension setup.


The power connector is on one side. The power switch is on the other. The back has some mounting holes. I did it this way because I was not sure whether I would hang it on the wall or set it on the desk. An unfortunate side-effect of this mounting configuration is that a few of the parts are more visible through the window than I’d like.
After all but the back went on, the panel-mount electronics components went into place: the push-on/push-off toggle button and the DC adapter plug. Once in place I could solder everything together. Apparently, I did not take any photos of the assembled electronics. It was just a matter of connecting the DC to the pushbutton through a small potentiometer (to vary brightness) and to the stick-on white LED strip. I then stuck the strip around the inside: across the bottom, up one side, across the top, then back down the other. I also stuck the potentiometer in place, once set to a good brightness, so that it would not rattle around. I then carefully attached the back and considered it done!
Parts
- Unique Parts
- 16M3 screws
- M3 nuts
- white LED strip, 1m (I did not use the full length)
- 9 VDC power supply
- panel-mount power jack
- panel-mount toggle switch
- optional: small trim potentiometer, 10K
- laser-cut panels, opaque 1/8″ acrylic (front, back, top, bottom, sides)
- laser-cut panel, translucent 1/8″ acrylic (etched logo)
- Common Parts
- black electrical tape
- hookup wire
- soldering iron, solder
Templates

Lessons Learned
Overall, the project turned out quite well and I am pleased with the result. If I were to do this again, I would change a few things.
First, I made a mistake in the placement of one of the holes on the face. I now forget the specific one, but I think it was either the upper or lower right. The holes were consistent through the two faces, but did not match the corresponding bolt retainer in the side piece. This was after about four or five print revisions — of printing everything out on cardstock, cutting out the pieces, and seeing if everything lines up as it should. My Dremel basically made it work, but would need to be fixed in a future version.
Second, the electronics components were much more visible through the window than I thought they would be — especially the pushbutton. If I were to do this again, I think I would either rearrange their position or use a frosted piece of plexiglass.
Third, the face collects dust very well and some of the letter stencil parts, which seemingly strong, feel more fragile than I would like especially when transporting it. I think I might add a third layer to the face — a completely transparent sheet that does not let any dust in, nor allows anything to touch, push on, or otherwise mess with the letters.
2 thoughts on “A laser-cut light-up nameplate”